How to build an Ethereum private blockchain using Geth
Introduction
This post will discuss building a private network of multiple nodes based on Geth (the official Go implementation of the Ethereum protocol).
If the nodes of an Ethereum network are not connected to the main network or any other public network, then the network is called a private network.
We must provide our private network with a network ID not used by public networks. You can check all the public network ids at chainlist.
Sometimes network id is also referred to as chain id. Let’s move ahead and set up the private blockchain network.
Setup
Step 1: Install the geth client
The first thing we need to do is to download and install the Geth client. You should have access to geth binary before moving ahead.
Step 2: Create genesis.json
Every blockchain starts with a genesis (first) block. The genesis block is configured using a genesis.json file for a private network. Inside a new folder/directory, create a genesis.json file with the below content.
{
    "config": {
        "chainId": 2345,
        "homesteadBlock": 0,
        "eip150Block": 0,
        "eip155Block": 0,
        "eip158Block": 0
    },
    "alloc": {},
    "coinbase": "0x0000000000000000000000000000000000000000",
    "difficulty": "0x400",
    "extraData": "",
    "gasLimit": "0x2fefd8",
    "nonce": "0x0000000000000042",
    "mixhash": "0x0000000000000000000000000000000000000000000000000000000000000000",
    "parentHash": "0x0000000000000000000000000000000000000000000000000000000000000000",
    "timestamp": "0x00"
}
The most important thing here is chainId inside config. It is the network id we discussed in the previous section. There are a few more parameters required for the setup. You are not required to know them but you can read this post for details.
Step 3: Initiate the private blockchain
We have the configuration ready for the genesis block. Let’s run our first geth command to initialize the private blockchain.
geth --datadir ./node1 init genesis.jsonThis command will create a folder node1 in the current directory. Inside this directory, there will be a lot of folders/files created. You are not required to know them all.
Optionally, you can run the command below to access the Javascript console attached to the blockchain we created.
geth --datadir ./node1 consoleMake sure you disconnect from the console by typing exit. You can also use Ctrl+d to stop.
Step 4: Add the first node to the private blockchain
To start the first node and also attach a console to it, run the below command:
geth --datadir ./node1 --syncmode "full" --port 30304 --http --http.addr "localhost" --http.port 8552 --http.api "personal,eth,net,web3,txpool,miner,admin" --http.corsdomain="*" --networkid 2345 --allow-insecure-unlock --authrpc.port 8553 consoleThe most important input here is networkid, representing our private blockchain’s chainId given in genesis.json. There are a few important flags passed in this call. All HTTP-related flags are for accessing the node using HTTP protocol. Let’s see the most important flags.
port: Our node is running on this port.
http.port: This is for the HTTP protocol access.
authrpc.port : This is for UDP and WS access.
We need to provide a different value for all these three ports for each node in our blockchain, as we will run all our nodes locally.
The command output should have a enode value. This value represents the node. See below code snippet and diagram for example.
self=enode://6bac6fdaa3e7bc3e15ca38559405e8db6e0b082bed5183ef6c796b806d28db41f8a9e7768546451ee832d91312fb826fd57b543be379128f3b51f8b994135717@127.0.0.1:30304
Step 5: Add one more node to the private blockchain
We need a separate folder/directory for the datadir in the second node, but the genesis file will be the same. So let’s first initialize the second node. Use the below command for that:
geth --datadir ./node2 init genesis.jsonTo run the node, we need to change a few input parameters as discussed in the previous step. Let’s modify port, http.port and authrpc.port in the previous command. I have listed an example command below:
geth --datadir ./node2 --syncmode "full" --port 30305 --http --http.addr "localhost" --http.port 8554 --http.api "personal,eth,net,web3,txpool,miner,admin" --http.corsdomain="*" --networkid 2345 --allow-insecure-unlock --authrpc.port 8555 consoleTake note of the enode value for this node also.
self=enode://2901e179d1a5c2d38b9e648406869ce5579012c04e834b8ec29103ace310964978b6dc66cfa1331f15e8af2c34a53a1756e2d0215b6800dc5300e3072be80528@127.0.0.1:30305
We can repeat this process for any number of nodes as required.
Step 6: Connect node2 with node1 as peer
For this post, we will add the peer nodes using a manual process. There are ways to automatic discovery of peers. We will cover that in the next post.
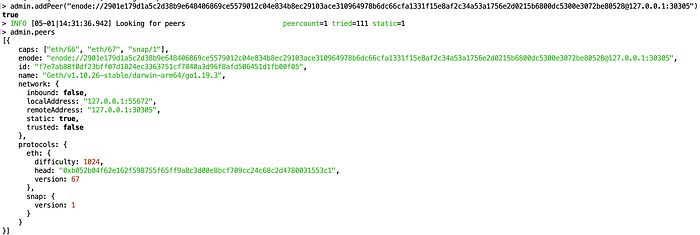
Go to the node1 console and add the node2 enode value using admin.addPeer command. The command will look like the below:
admin.addPeer("enode://2901e179d1a5c2d38b9e648406869ce5579012c04e834b8ec29103ace310964978b6dc66cfa1331f15e8af2c34a53a1756e2d0215b6800dc5300e3072be80528@127.0.0.1:30305")
After running the command, Check if the peer is added successfully by running the command admin.peers. See the image below for an example.
You can also run the admin.peers in the node2 console to see the enode for node1.
Step 7: Do a transaction between two accounts
There are different ways to create an account, but we will use the simplest one here. Run personal.newAccount() command on the console of both nodes and remember the Passphrase entered. You can not recover that, so note it down somewhere.
> personal.newAccount()
Passphrase:
Repeat passphrase:
INFO [05-01|14:34:37.856] Your new key was generated               address=0xA6b35AE2D95bA88f853EdDC6ecEe5800bCFa2610
WARN [05-01|14:34:37.856] Please backup your key file!             path=/Users/hemant.gupta/private-blockchain-work/private-blockchain-geth/node1/keystore/UTC--2023-05-01T09-04-36.868804000Z--a6b35ae2d95ba88f853eddc6ecee5800bcfa2610
WARN [05-01|14:34:37.856] Please remember your password!
"0xa6b35ae2d95ba88f853eddc6ecee5800bcfa2610"
Check the output above. The command will return an address. It is the public address of your newly created account. Also, it will return the path of the private secret key file corresponding to this address. These two values combined are called public-private key pair.
See the list of accounts and their balance using below commands:
# It will return list of accounts
eth.accounts
...

#The first account is accounts[0], use that to get its balance
eth.getBalance(eth.accounts[0])
To fund the account, let’s start mining!
Go to the node1 console and type the below command to start mining. The value passed in the start method is the number of CPUs used.
miner.start(1)Mining can be stopped at any time by command: miner.stop()
If you allow mining for some time and then check the balance of your node1 account, you will see some test ethers there.
Let’s send some ethers to the node2 account!!!
Before doing the transaction, we have to unlock the node1 account. Use the below command in the node1 console and provider the password of your node1 account.
personal.unlockAccount(eth.accounts[0], "<account-password>")The command should return true if the account is unlocked successfully. Let’s go ahead with the transaction.
The eth.sendTransaction method is used for token transfer. It takes three values — from account, to account and token value. I am sending 4 ethers in this example.
eth.sendTransaction({from:eth.accounts[0], to:"0x52e85f4fde9ac49832b33c2f2dd3bab805a6c8c0", value: web3.toWei(4, "ether")})
INFO [05-01|14:37:48.070] Setting new local account                address=0xA6b35AE2D95bA88f853EdDC6ecEe5800bCFa2610
INFO [05-01|14:37:48.070] Submitted transaction                    hash=0x1c0a9e1ec6284ce01534bfb5aa2b0b082e8f4e5cad2a5b641b1ef96fe2b121f4 from=0xA6b35AE2D95bA88f853EdDC6ecEe5800bCFa2610 nonce=0 recipient=0x52e85F4FDe9Ac49832B33c2F2Dd3bAb805A6C8C0 value=4,000,000,000,000,000,000
"0x1c0a9e1ec6284ce01534bfb5aa2b0b082e8f4e5cad2a5b641b1ef96fe2b121f4"
You should get the transaction hash in the command output. Use this hash to know the details of the transaction by command eth.getTransaction(“<transaction-hash>”).
> eth.getTransaction("0x1c0a9e1ec6284ce01534bfb5aa2b0b082e8f4e5cad2a5b641b1ef96fe2b121f4")
{
  blockHash: "0x8df6e10ecccc3d3973c33d538d905bb9a4362b819d0e8a84419d2ec713efd7b8",
  blockNumber: 45,
  chainId: "0x929",
  from: "0xa6b35ae2d95ba88f853eddc6ecee5800bcfa2610",
  gas: 21000,
  gasPrice: 1000000000,
  hash: "0x1c0a9e1ec6284ce01534bfb5aa2b0b082e8f4e5cad2a5b641b1ef96fe2b121f4",
  input: "0x",
  nonce: 0,
  r: "0x2b129ec1b410716b4ba7288b9e88274c389c269b65461bab50a8eba685e1004",
  s: "0x21a71422f4e5316450122311220146c66d3c65c8a3549c62406dfe198977f8af",
  to: "0x52e85f4fde9ac49832b33c2f2dd3bab805a6c8c0",
  transactionIndex: 0,
  type: "0x0",
  v: "0x1276",
  value: 4000000000000000000
}
Don’t forget to go to the node2 console and check the balance.
> eth.getBalance(eth.accounts[0])
4000000000001000000
This post focused on executing all the steps by running the required geth commands. It helps in building the fundamentals. I will cover building the private blockchain using docker in the next post. Be ready to get surprised! It is going to easy and fun.
Happy BUIDLing.
References:
Geth Homepage: https://geth.ethereum.org/
Geth Download: https://geth.ethereum.org/downloads
Ethereum Private Networks: https://geth.ethereum.org/docs/fundamentals/private-network